Ваз 2112: замена генератора своими руками
Генератор Ваз 2112
Как известно, генератор на автомобиле предназначен выполнять важнейшие функции. В Ваз 2112 замена генератора – обычный и распространенный процесс, с которым можно справиться и своими руками.
Замена генератора Ваз 2112 – интересный и увлекательный тур по системе автомобиля, способный дать новичку ценный багаж знаний.
Для чего нужен генератор
Как известно, генератор – это устройство автомобиля, которое обеспечивает электричеством различные элементы, преобразуя механическую энергию в ток. Это своеобразный источник энергоснабжения, который частенько заменяет стабильное центральное питание.
Другими словами, автомобильный генератор заряжает АКБ при работающем моторе.
Основная информация о генераторе
Итак:
- Размещен генератор на Ваз 2112, как правило, в передней части двигателя.
- Приводится в работу коленчатым валом.
Как правило, различают две разновидностей генератора, два его типа. Традиционный генератор и компактный.
Эти типы различаются друг от друга компоновкой вентилятора, устройством корпуса, шкивом и многим другим.
Но общие детали у них неизменны:
- ротор;
- статор;
- щеточный узел;
- регулятор напряжения;
- выпрямительный блок.
Примечание. Все вышеперечисленные элементы помещены в закрытый корпус.
Рассмотрим в отдельности каждый элемент генератора.
Ротор
Эта деталь предназначена для того чтобы создавать вращающееся магнитное поле:
- На валу ротора имеется обмотка возбуждения, которая специально помещена в две полюсные половины.
Примечание. Каждая из этих полюсных половинок имеет 6 выступов.
- На валу ротора имеется два контактных кольца, через которые и осуществляется питание обмотки возбуждения.
Примечание. Как правило, кольца эти бывают сделаны из меди, а иногда и из стали или латуни.
Статор
Этот элемент служит для того чтобы создавать переменный электрический ток:
- Статор объединяет обмотку и металлический сердечник, который состоит из стальных пластин.
Примечание. В сердечнике бывает выполнено 36 пазов, куда укладываются три обмотки. Вместе они образуют трехфазное соединение. Корпус
Корпус генератора – это элемент, который представляет собой две крышки. Передняя крышка размещена со стороны приводного шкива генератора, а задняя – со стороны контактных колец.
Щеточный узел
Благодаря этому узлу обеспечивается подача тока на контактные кольца. Две графитные щетки, пружины и щеткодержатель – вот и все то, из чего состоит щеточный узел.
Выпрямительный блок
Этот элемент преобразует синусоидальное напряжение в напряжение постоянного тока. Состоит выпрямительный блок из пластин-теплоотводов и диодов.
Регулятор напряжения
Предназначен для поддержания напряжения в генераторе.
На сегодняшний день известны несколько конструкций этих самых элементов:
- регуляторы напряжения в гибридном исполнении;
- регуляторы напряжения в интегральном исполнении.
Замена и ремонт генератора
Замена генератора Ваз 21124
Как становится понятно, ни о какой нормальной эксплуатации транспортного средства и речи идти не может, если генератор неисправен. Деталь эта обязана подвергаться техническому осмотру каждые 15 тыс. км пробега.
Если на стадии диагностики выявляются замечания, то их следует в срочном порядке устранять.
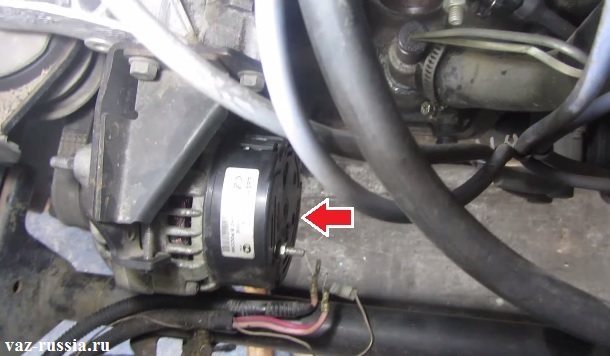
Демонтаж генератора
Заменить генератор Ваз 2112
Снять генератор своими силами не составит никакого труда.
Рассмотрим алгоритм действий:
- В первую очередь, следует отсоединить минусовой провод от АКБ.
- Берем ключи на 10 и 13.
- Находим провод, который идет на генератор и отсоединяем его.
- Гайку крепления провода к выводу на плюс, также отворачиваем.
- Снимаем провод вывода.
- Теперь надо снять натяжную планку генератора.
Ваз 2112 как снять генератор
- Находим нижнее крепление генератора и отворачиваем гайку, которая фиксирует деталь с этой стороны.
- Болт крепления демонтируем.
- Генератор снимаем с Ваз 2112.
- Проводим замену.
Примечание. После того, как генератор снят, обычно проводится его разбор, для определения причины поломки.
Разбор генератора
Ваз 2112 снятие генератора
После того, как генератор снят, выполняется разбор устройства, чтобы определить причину выход из строя:
- 3 пружинных фиксатора отжимаются.
- Снимается защитный кожух диодного моста генератора.
- Теперь следует отвернуть винты крепления регулятора напряжения (лучше всего для этого подойдет фигурная отвертка).
- Колодку с проводом также отсоединяем от вывода реле-регулятора.
- Снимаем его.
Ваз 2112 снять генератор
- Теперь надо снять выпрямительный блок или как его еще называют, диодный мост. Вооружаемся накидным ключом на 8, фигурной отверткой и ключом на 10.
- Отворачиваем три болта, соединяющих выводы обмоток статора с диодным мостом.
- Провода выводов обмотки статора отгибаем в сторону.
- Винт крепления конденсатора отворачиваем, используя фигурную отвертку.
- Снимаем выпрямительный блок и конденсатор(см.Меняем конденсатор (генератор ваз)).
- Теперь выворачиваем две гайки контактного болта, для этого используя ключ на 10.
- Снимаем втулки.
- Демонтируем главный болт выпрямительного блока.
Обычно на данном этапе удается найти причину поломки. Если нет, то разбор продолжается дальше, вплоть до снятия подшипников.
Инструкция, представленная выше, дает практическое понимание того, как заменить генератор своими руками. В процессе рекомендуется изучить фото и видео – материалы, как наглядные пособия.
Замена генератора на ВАЗ 2110, ВАЗ 2111, ВАЗ 2112
Добро пожаловать!
Генератор – очень важная вещь без которой ездить на автомобиле будет просто невозможно (Это если аккумулятор сел, если же ещё нет, то можно и на нём по ездить), благодаря нему (Генератору) аккумуляторная батарея и вся бортовая сеть у автомобиля питается током когда двигатель заведён, за счёт этого на заведённом движке можно случать долго музыку, включать на сколько угодно печку и т.д., (Вить аккумулятор то не садиться), но если генератор вдруг выйдет из строя, то машина будет ехать на одном аккумуляторе, долго она так не проедет (Смотря что включено, если музыка, а так же свет и другие приборы, то аккумулятор очень быстро сядет) и поэтому в конечном итоге когда аккумулятор разрядится, автомобиль встанет и больше не куда не поедет (Вить система зажигания питается электричеством, а если электричество не одна деталь в двигатель не будет подавать, то просто искры на свечах зажигания не будет, в связи с этим смесь не будет загораться, благодаря чему автомобиль вы больше не заведёте или если он был заведён, то сразу же заглохнет).
Примечание!
Для замены генератора на новый, потребуется смотровая яма или же при помощи домкрата можно поднять автомобиль, снять колесо и таким образом работать, из инструментов же вам пригодятся: Гаечные ключи, если есть накидными так же запаситесь, ну и перчатками конечно, чтобы руки при работе не испачкать!
Краткое содержание:
Где находится генератор?
В передне приводных автомобилях он расположен очень удобно, в отличии от классики где из-за продольного расположения двигателя, к генератору подобраться бывает чутка сложно, но всё же в обоих автомобилях снять его не составит труда, просто понадобится время, силы и терпение и ещё WD-40 запаситесь на всякий случай, вернёмся ближе к теме, более подробно увидеть где генератор установлен, смотрите на фотографии которая расположена чуть ниже:
Когда нужно менять генератор?
Менять или не менять это всё на ваше усмотрение, данная деталь довольно долгое время живет если она не подвергается воздействию на неё воды или чего ни будь подобного, но всё же основная проблема которая говорит что генератор пора снимать, это конечно же слабый ток который генератор из-за изношенности еле еле может подавать в бортовую сеть автомобиля (Фары тускло горят, при включении дополнительного оборудования фары или ещё что то начинает гореть ещё хуже, к примеру включили печку, она дует хорошо, включили фары, начала хуже дуть, включили щётки чтобы лобовое стекло протереть, а печка ещё хуже дует, это и говорит о том что слабый ток в бортовой сети который даёт один только аккумулятор), ещё генератор может не ровный ток давать (То есть он скачет, из-за этого свет фар может то тускнеть, то бить сильнее и так далее) или даже не давать его вообще, вот такого вот подобного рода проблемы будут проявляться если генератор у автомобиля будет неисправен, но его не всегда нужно менять, если к примеру щётки вышли из строя, то их можно заменить (Они стоят копейки) и эксплуатировать генератор дальше, более подробно как отремонтировать генератор, как проверить на исправность его щётки, диагностический мост и многое другое, читайте в статье: «Подробный ремонт генератора на передне приводном автомобиле».
Примечание!
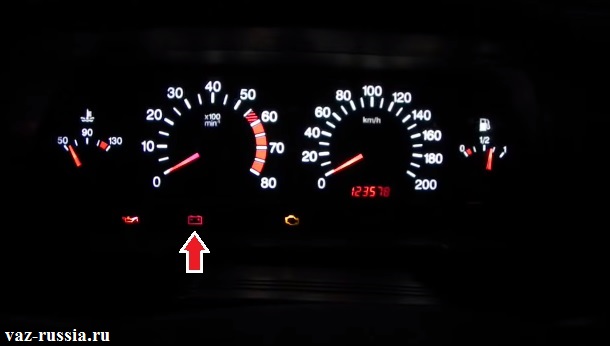
Самое главное когда генератор выходит из строя и перестаёт подавать нормальное напряжение в бортовую сеть, на приборной панели загорается лампа того что системы у автомобиля (Печка, фары и т.д.) питаются лишь от одной аккумуляторной батареи (На фото эта лампа стрелкой указана, при заведении движка она обязательно должна будет погаснуть), поэтому если вы увидели эту лампу и она не пропадает при работе двигателя, сразу можете уже грешить на генератор, но в начале его предохранитель проверьте (Не сгорел ли он)!
Как заменить генератор на ВАЗ 2110-ВАЗ 2112?
Примечание!
Перед началом, скиньте клемму минус с автомобиля, делается это при помощи гаечного ключа как правило размером «на 10», более подробно как скинуть клемму, читайте в статье: «Замена аккумулятора на автомобиле», в этой статье пункт 1 прочтите!
Снятие:
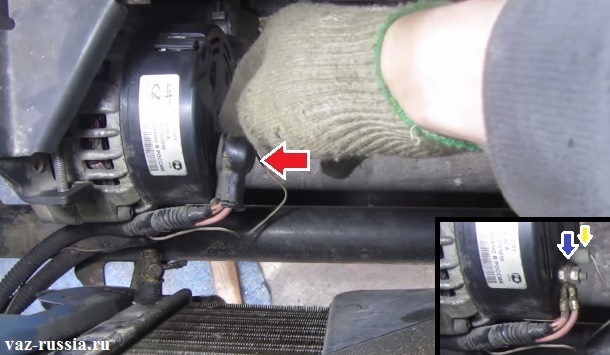
1) В начале заехать на яму будет нужно или же поднять высоко правую переднюю часть и снять правое колесо с автомобиля (Смотрите по ходу движения авто), если вы не умеете правильно снимать колёса с автомобиля, в таком случае прочтите статью: «Замена колеса на ВАЗ», после проделанной работы отверните гайки и винты которые крепят защиту картера и пыльник к автомобиля, затем снимите защиту (Если она у вас есть) и снимите пыльник и перебирайтесь в подкапотное пространство автомобиля, а находясь там, отсоедините разъём провода от клеммы (Данный разъём указан жёлтой стрелкой), выкрутите гайку крепящую две клеммы (см. маленькое фото, она указана синей стрелкой) и скиньте клеммы, ну и самое главное, чтобы подобраться к гайки которая клеммы «+» крепит (Данная гайка указана синей стрелкой), отвести резиновый чехол (Указан красной стрелкой) в сторонку не забудьте и обратно (Когда генератор устанавливать будете) его установить на своё место не забудьте.
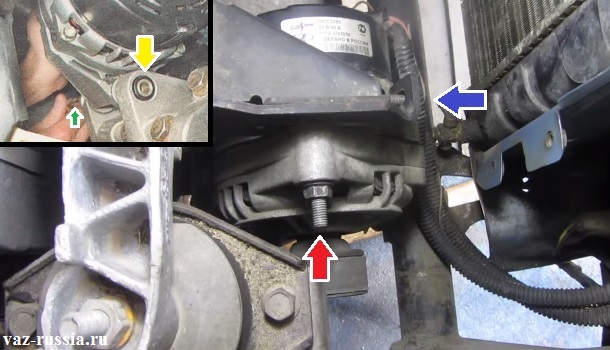
2) Как только все контакты будут отсоединены, открутите полностью регулировочный болт который указан синей стрелкой и его выньте, а так же гайку которая указан красной стрелкой отверните и выньте её болт из генератора (Его выбить можно при помощи молотка, или же рукой попробовать снять), после проделанных операций залезьте под автомобиль и выверните гайку болта (Место где гайка должна находится, указано жёлтой стрелкой) и извлеките сам болт который указан зелёной стрелкой из отверстия, после чего приподняв генератор, снимите с его шкива ремень и тем самым полностью с автомобиля генератор снимите.
Примечание!
На разных автомобилях генератор крепится по разному, где то на верху два болта идёт как на фото выше показано, на каких то автомобилях всего лишь один регулировочный болт на верху присутствует и один нижний, но всё же разобраться в этих болтах очень легко, вы просто взгляните на генератор и сразу же разберётесь какие болты его крепят!
Установка:
Новый генератор ставится в обратном порядке, после его установки ремень генератора на шкив оденьте и отрегулируйте ремень, делается это при помощи регулировочного болта, более подробно читайте в статье под названием: «Замена ремня генератора на автомобиле».
Дополнительный видео-ролик:
Увидеть подробный ролик про то как заменяется генератор на автомобиле, вы можете чуть ниже:
Инструкция в картинках и видео для тех, кто хочет самостоятельно поменять генератор на ваз 2110, 2111, 2112.
Процедура снятия
- Первым делом снимаем ремень с генератора.
 2. Отсоединяем колодку от вывода «D» генератора.
 3. Снимаем защитный чехол, откручиваем гайку и отсоединяем провода от вывода «В+».
 4. Выкручиваем натяжной болт.
 5. Откручиваем верхнее крепление генератора.
 6.Вынимаем натяжную планку.
 7. Откручиваем нижнее крепление генератора.
 8. Снимаем дистанционную втулку.

9. Вынимаем болт крепления генератора и снимаем его.
Процедура установки
- Устанавливаем генератор на место в обратном порядке.
- После установки генератора нужно отрегулировать натяжение ремня.
Видео по замене генератора:
Замена, Как снять, Крепление, Ремонт
Генератор — деталь без которой эксплуатация автомобиля невозможна. Проверка его состояния должна производиться каждое ТО (15тыс.км.). Если в процессе диагностики генератора были выявлены замечания, их нужно в срочном порядке устранить. Рассмотрим, как самостоятельно снять генератор, а также разобрать его (снять регулятор напряжения, диодный мост и подшипники).
Оглавление
Замена
Как снять
Крепление
Ремонт
Как проверить
Замена
Как становится понятно, ни о какой нормальной эксплуатации транспортного средства и речи идти не может, если генератор неисправен. Деталь эта обязана подвергаться техническому осмотру каждые 15 тыс. км пробега.
Если на стадии диагностики выявляются замечания, то их следует в срочном порядке устранять.
Демонтаж генератора
Снять генератор своими силами не составит никакого труда.
Рассмотрим алгоритм действий:
В первую очередь, следует отсоединить минусовой провод от АКБ.
Берем ключи на 10 и 13.
Находим провод, который идет на генератор и отсоединяем его.
Гайку крепления провода к выводу на плюс, также отворачиваем.
Снимаем провод вывода.
Теперь надо снять натяжную планку генератора.
Находим нижнее крепление генератора и отворачиваем гайку, которая фиксирует деталь с этой стороны.
Болт крепления демонтируем.
Генератор снимаем с Ваз 2112.
Проводим замену.
Примечание. После того, как генератор снят, обычно проводится его разбор, для определения причины поломки.
Разбор генератора
После того, как генератор снят, выполняется разбор устройства, чтобы определить причину выход из строя:
3 пружинных фиксатора отжимаются.
Снимается защитный кожух диодного моста генератора.
Теперь следует отвернуть винты крепления регулятора напряжения (лучше всего для этого подойдет фигурная отвертка).
Колодку с проводом также отсоединяем от вывода реле-регулятора.
Снимаем его.
Теперь надо снять выпрямительный блок или как его еще называют, диодный мост. Вооружаемся накидным ключом на 8, фигурной отверткой и ключом на 10.
Отворачиваем три болта, соединяющих выводы обмоток статора с диодным мостом.
Провода выводов обмотки статора отгибаем в сторону.
Винт крепления конденсатора отворачиваем, используя фигурную отвертку.
Снимаем выпрямительный блок и конденсатор(см.Меняем конденсатор (генератор ваз)).
Теперь выворачиваем две гайки контактного болта, для этого используя ключ на 10.
Снимаем втулки.
Демонтируем главный болт выпрямительного блока.
Обычно на данном этапе удается найти причину поломки. Если нет, то разбор продолжается дальше, вплоть до снятия подшипников.
Инструкция, представленная выше, дает практическое понимание того, как заменить генератор своими руками. В процессе рекомендуется изучить фото и видео – материалы, как наглядные пособия.
Цена такого ремонта естественно не будет высокой, ведь все работы выполняются самостоятельно.
Как снять
Ход работ:
Первое что нужно сделать – отключить минусовую клемму аккумулятора, чтобы ничего не замкнуть
Далее необходимо снять брызговик двигателя (о том как его снять читаем здесь)
Отсоединяем провод возбуждения генератора , как показано на рисунке
Берем ключ на 10 и откручиваем гайку крепления проводов к плюсовому приводу генератора и снимаем оба провода
После этого нужно снять ремень генератора (читаем здесь, как снять ремень генератора )
Далее берем накидной ключ на 10 и откручиваем регулировочный болт генератора , после чего вынимаем его из верхнего кронштейна.
Снимаем натяжную планку
Берем ключ на 13 и откручиваем гайку нижнего крепления генератора и вынимаем болт (как показано на рисунках), придерживая генератор
После этого можно снимать сам генератор
Крепление
Ваз 2112, крепление генератора не должно вызвать сложности, так как практически во всех марках отечественных автомобилей установка происходит аналогично. Но для того чтобы работа, выполненная своими руками, не вызывала недовольства необходимо помнить обо всех нюансах.
Перед тем как произвести крепление генератора, на ваз 21124, необходимо убедиться в том, что клемма аккумулятора с минусом была отключена. Это один из важных пунктов в работе, так как в обратном случае может произойти замыкание.
Далее, необходимо правильно расположить генератор, при этом постоянно удерживая его. С помощью ключа №13 закрутить болты, так как показано на фото ниже.
Установить натяжную планку.
Воспользовавшись специальным накидным ключом №10 закрутить регулировочный болт в верхнем кронштейне.
Правильно натянуть ремень генератора, чтобы в дальнейшем не было поломок.
С помощью ключа №10 прикрутить гайку, предназначенную для крепления проводов, к приводу генератора с плюсовой полярностью. Таким образом, устанавливаются оба провода.
Присоединить провод возбуждения устройства.
Установить брызговик двигателя.
Включить клемму с отрицательной полярностью для возобновления работы. После полной установки лучше проверить ремень привода генератора, нужно урегулировать натяжение.
Процессу крепления предшествует снятие устройства, определение поломки, последующий ремонт. Для того чтобы снять конструкцию нужно произвести действия в обратном порядке.
Работа машины не может быть продолжена, если существуют проблемы в работе генератора. Необходимо проверять устройство после пробега в 15000 км. Диагностика определяет состояние и при каких-либо неисправностях, необходимо срочно исправить ситуацию не откладывая на потом.Ремонт всегда включает в себя разбор детали. Для этого используются ключи № 10, 13. Чаще всего, причина определяется на этапе демонстрации главного болта выпрямительного блока. Если же, поломку определить не удалось нужно продолжить разбор до конца.
Ремонт
Проверка диодного моста
В диодном мосту нужно прозвонить все диоды, которые как известно, пропускаю ток только в одном направлении, в противном случае он пробит и мост подлежит замене.
Проверка обмоток генератора
Далее ротор нужно проверить на предмет короткого замыкания. Это можно проверить тестером или «контролькой» и дополнительным проводом. Контрольная лампа подсоединяется одним концом на клемму аккумулятора, а вторым концом на корпус ротора. Второй провод соединяется с другой клеммой аккумулятора, и поочередно вторым концом провода касаемся до контактных колец. Лампа не должна гореть в обоих случаях, если же лампа горит, то в обмотке есть замыкание и ротор выбраковывается. Стрелка прибора также не должна отзываться при прозвонке ротора.
При осмотре статора нужно обратить внимание на его внутреннюю поверхность, где не должно быть механических следов, «говорящих» о задевании ротора о статор. Задевание будет подсказывать о изношенных подшипниках или износе посадочного отверстия в крышках.
Далее обмотку статора нужно также прозвонить на обрыв. При проверке выводов обмоток, они должны все «звониться» между собой. Если какая — то пара не «звонится», значит, в обмотке есть обрыв и ее необходимо либо перемотать, либо заменить статор целиком.
Далее нужно проверить не замыкаются ли обмотки статора на корпус, для чего прибор подсоединяют поочередно между корпусом статора и концами обмоток, прибор нигде не должен «звониться». В противном случае есть замыкание, и статор также подлежит выбраковке.
После выполнения ремонта генератор собирается в обратной последовательности.
Как проверить
Запустите двигатель ваз, дайте ему поработать несколько минут, затем, нажав на педаль «газа», доведите обороты коленчатого вала до 3000 мин -1.
Включите все потребители: дальний свет фар, обогрев заднего стекла, вентилятор отопителя ваз 2111, стеклоочиститель, аварийную сигнализацию.
Замерьте напряжение на выводах аккумуляторной батареи, которое должно быть выше 13 В. Если это не так, неисправны обмотки генератора (обрыв или замыкание), регулятор напряжения со щеточным узлом или окислены контактные кольца обмотки возбуждения.
Для того чтобы убедиться в исправности регулятора напряжения, выключите все потребители, кроме фар дальнего света, и вновь измерьте напряжение. Оно должно быть в пределах 13,2-14,7 В.
Снятый регулятор напряжения можно проверить, подключив между щетками лампу (1-5 Вт, 12 В), а к выводам «D+» и «масса» — источник питания (только постоянного тока!), вначале напряжением 12 В, а затем 15-16 В. В первом случае лампа должна гореть, во втором – нет. Если лампа горит в обоих случаях, в регуляторе – пробой, если не горит – обрыв или нарушен контакт между щетками и выводами регулятора. В обоих случаях регулятор следует заменить.
Для проверки вентилей выпрямительного блока отсоедините провода от аккумуляторной батареи, генератора и от вывода «D+» регулятора напряжения.
«Плюс» батареи через лампу (1-5 Вт, 12 В) подсоедините к выводу «В+» генератора, а «минус» — к его корпусу. Если лампа горит, то и в блоке «положительных», и в блоке «отрицательных» вентилей имеется короткое замыкание.
Для проверки замыкания в «положительных» вентилях «+» батареи через лампу соедините с выводом «В+» генератора, а «-» — с выводом одной из фазных обмоток статора. Если лампа горит, пробиты один или несколько положительных вентилей.
Для проверки замыкания в «отрицательных» вентилях «+» батареи через лампу соедините с выводом одной из фазных обмоток статора, а «-» — с корпусом генератора. Если лампа горит, пробиты один или несколько отрицательных вентилей или обмотки статора замыкают на корпус генератора ваз 2110. Чтобы исключить замыкание обмоток, генератор снимают с автомобиля и, отсоединив обмотки от регулятора напряжения и выпрямительного блока, проверяют их замыкание на «массу» с помощью лампы или омметра. Вентили генератора можно также проверить омметром, не подключая аккумулятор и контрольную лампу.Замыкание дополнительных диодов можно проверить, подключив «+» батареи через лампу к выводу «D» генератора, а «-» — к выводу одной из фазных обмоток статора. Если лампа горит, один или несколько дополнительных диодов пробиты.
Обрыв в основных вентилях определяется по резкому снижению тока отдачи (падению напряжения под нагрузкой). Однако это может быть также следствием обрыва или замыкания в обмотках генератора. Обрыв в дополнительных вентилях можно определить по низкому напряжению на штекере «D» (ниже 14 В) при средней частоте вращения ротора генератора ваз 2110.
Определить исправность каждого диода (основного или дополнительного) можно только на снятом выпрямительном блоке омметром или контрольной лампой.
Выпрямительный блок ваз 2112 при выходе из строя рекомендуется заменять в сборе. Допускается замена отдельных вентилей, однако для основных вентилей потребуется их перепрессовка в держателе – операция, требующая аккуратности и навыка.
Через несколько лет после покупки машины может произойти поломка. Чаще всего владельцы автомобилей сталкиваются с проблемой в работе генератора. Для того чтобы избавиться от проблемы нужно:
- снять устройство;
- разобрать, обнаружить ошибку, исправить или приобрести новый генератор;
- установить функционирующее устройство.
Генератор
Для того чтобы самостоятельно разбирать детали машины необходимо знать для чего они предназначены. Так, генератор — это конструкция, которая предназначена для того, чтобы происходило обеспечение электричеством всех деталей, путём преобразования механической энергии в ток. То есть, происходит заряжение АКБ во время работы мотора.
Краткая информация:
- генератор размещается в передней части двигателя;
- с помощью коленчатого вала происходит начало работы.
На сегодняшний день существует два вида устройств: компактный и традиционный. Между ними есть существенные отличия, например, различная компоновка вентилятора, вид корпуса и прочее. Но основные детали остаются неизменными. Поэтому, если владелец автомобиля хотя бы раз самостоятельно разобрался в деталях, то при разборе устройств, другого типа сможет легко работать. Составляющие детали — ротор, щёточный узел, статор, выпрямительный блок.
Крепление генератора на ваз 2112
Ваз 2112, крепление генератора не должно вызвать сложности, так как практически во всех марках отечественных автомобилей установка происходит аналогично. Но для того чтобы работа, выполненная своими руками, не вызывала недовольства необходимо помнить обо всех нюансах.
- Перед тем как произвести крепление генератора, на ваз 21124, необходимо убедиться в том, что клемма аккумулятора с минусом была отключена. Это один из важных пунктов в работе, так как в обратном случае может произойти замыкание.
- Далее, необходимо правильно расположить генератор, при этом постоянно удерживая его. С помощью ключа №13 закрутить болты, так как показано на фото ниже.
- Установить натяжную планку.
- Воспользовавшись специальным накидным ключом №10 закрутить регулировочный болт в верхнем кронштейне.
- Правильно натянуть ремень генератора, чтобы в дальнейшем не было поломок.
- С помощью ключа №10 прикрутить гайку, предназначенную для крепления проводов, к приводу генератора с плюсовой полярностью. Таким образом, устанавливаются оба провода.
- Присоединить провод возбуждения устройства.
- Установить брызговик двигателя.
- Включить клемму с отрицательной полярностью для возобновления работы. После полной установки лучше проверить ремень привода генератора, нужно урегулировать натяжение.
Процессу крепления предшествует снятие устройства, определение поломки, последующий ремонт. Для того чтобы снять конструкцию нужно произвести действия в обратном порядке.
Работа машины не может быть продолжена, если существуют проблемы в работе генератора. Необходимо проверять устройство после пробега в 15000 км. Диагностика определяет состояние и при каких-либо неисправностях, необходимо срочно исправить ситуацию не откладывая на потом.Ремонт всегда включает в себя разбор детали. Для этого используются ключи № 10, 13. Чаще всего, причина определяется на этапе демонстрации главного болта выпрямительного блока. Если же, поломку определить не удалось нужно продолжить разбор до конца.
Возможные отрицательные последствия
Существует ряд последствий, которые могут возникнуть при установке генератора в нижнем кронштейне. Например, из-за втулки вся конструкция тяжело входит, натяжение ремня осуществляется только после того, как был закручен специальный натяжной болт с использованием ключа №10. Гайки (№13) должны быть затянуты после проверки ремня, причём его натяжка должна происходить и во время закручивания гаек, находящихся сверху.
В том случае, если конструкция была затянута намного сильнее положенного, произойдёт быстрый износ деталей, (таких как ремень, шкив, подшипники), а, следовательно, и скорая поломка. А слабое натяжение приведёт к порче запчастей, своеобразному свисту во время работы, к невозможности зарядить аккумулятор и впоследствии, к её замене.
Правильное регулирование ремня
Чтобы генератор служил долгое время необходимо определить положение ремня.
- Деталь должна чуть прогибаться — приблизительно 10 мм, в процессе усилия 10 кгс между устройством и шкивами коленчатого вала. Если цифра отличается, то лучше сразу произвести регулировку. В первую очередь нужно произвести ослабление гаек верхнего, а также нижнего генератора.
- Затем определить всю конструкцию к блоку цилиндров, поворачивая, с права на лево (для того, чтобы произошло ощутимое освобождение ремня). Следовательно, для того чтобы затянуть, нужно проделать шаги в обратном направлении — отвести устройство от цилиндра, повернуть болт в направлении слева на право, то есть по часовой стрелке.
- С помощью ключа повернуть коленчатый вал в количестве двух раз по часовой стрелке, используя болт крепления шкива.
- Далее, нужно вновь сделать проверку крепления. Если результат будет плохим лучше сразу повторить действия.
- Натянуть две оставшиеся гайки.
Есть также и второй вариант проверки.Производить работы удобнее и лучше внизу машины, но для этого нужно снять правое переднее колесо. При замене, снятии ремня ослабляют натяжку гаек в нижней, верхней части. Болт, предназначенный для регулировки выворачивают на предельную величину, генератор пододвигают к блоку цилиндров и снимают ремень. После осмотра действующего ремня можно приступать к установке нового. Изначально лучше надеть его шкив коленчатого вала, а потом – самого генератора.
Кронштейн
Чаще всего причина плохой работы автомобилей кроется не в самой конструкции, а в его кронштейне. Кронштейн крепления генератора ваз 2112 является непрочным, так как изготавливается не из металла. При неверной установке деталей происходит скос крепления всех близлежащих устройств, что, в свою очередь, даёт трещину на кронштейне.
Многие автовладельцы жалуются на то, что автозапчасти приходится менять каждые три месяца. Так, например, из всех машин, ломается крепление генератора ваз 21124 чаще всего. В этом случае, лучше посоветоваться со специалистами и при возможности сделать кронштейн из металла самостоятельно или заказать у мастера.
Необходимо помнить – поломка кронштейна является своего рода индикатором, указывающим на существование перекоса, неправильной установки генератора, чрезмерного натяжения или ослабления ремня. Только после того, как будет выявлена и устранена причина, детали будут служить долгое время.
Вышеописанная инструкция позволяет понять структуру и этапы установки деталей. Но чтобы лучше понять последовательность действий нужно ознакомиться с информацией, предоставленной в приложенном видео.Исходя из того, что работы должны выполняться самостоятельно, то и её цена будет низкой.
При последовательных действиях, снятие и установка позволят новичкам лучше понять внутреннее устройство машины. Главным девизом в такой работе является внимательность, так как при неправильном креплении или небольшом скосе, отклонении, в дальнейшем может произойти поломка многих запчастей, что приведёт к затратам.
90000 VAZ-21124 jerks when accelerating: what’s the problem? 90001 90002 What is the reason for the strange behavior of the car VAZ-21124 during acceleration and quiet driving, of interest to many motorists. The unexpected jerking on the climbs and the descents cause them to worry about the technical condition of the vehicle. Nobody wants to have problems on the roads, and God forbid that the deficiency was the root cause of the accident. Consider the most common causes that may directly or indirectly be related to this problem.90003 90002 Jerking the car can be divided into three types: 90003 90006 90007 Jerking at the beginning of the movement of the car VAZ-21124; 90008 90007 When driving the car jerks; 90008 90007 Overclocking. 90008 90013 90002 To determine the causes of these faults, you may need special equipment, which can be found in the service. However, practice shows that the causes of tremors and twitching of the machine can be set. And they may not necessarily be caused by insufficient amount of fuel in the fuel rail or malfunctions of the position sensor throttle.90003 90002 90017 90003 90019 Preventive action is better than repair 90020 90002 But first, you need to find the answer to the question of why VAZ-21124 jerks during acceleration. Mean, like, not quite the usual question. But in fact such twitching is not funny. Especially scary beginning to feel, when VAZ-21124 jerks during acceleration and turns on a check. Trouble has become a reality. 90003 90002 Long known any damage is easier to prevent than to eliminate. So try to pay more attention to your vehicle while driving.And here comes the problem: not every driver can feel the car in time to determine the cause. 90003 90002 Recommended 90003 90027 90002 How does the rear bushing front arm and how many it serves? 90003 90002 The Rear bushing front arm — one of the constituent elements of the vehicle chassis. He refers to the guide elements of the suspension together with the levers endures tremendous stress with wheels. However, with this this item, there are many … 90003 90032 90002 Oil consumption in the engine.Six reasons 90003 90002 It is Hardly possible to find a motorist who would not be worried about the increased oil consumption. It is especially annoying when it happens with another new motor. Here are the most common causes that result in the consumption of oil in the engi … 90003 90037 90002 How does the exhaust system? 90003 90002 The exhaust System is designed to remove combustion products from the engine and output them to the environment. It also must be ensured a reduction in noise pollution to acceptable limits.Like any other complex devices, this system consists of seve … 90003 90002 It is worth to determine the order of the actions: 90003 90044 90007 Check car jerking when driving at idle is unacceptable. You should do it only when driving. 90008 90007 Validation should begin very smooth and devoid of the danger of the track section, where there is no turbulent motion. 90008 90007 To test start it in turns to carry out the gear change by pressing each one on the gas pedal. 90008 90007 If the vehicle starts to twitch without your participation, therefore, the root cause of the problem you need to look into this problem.90008 90053 90019 Causes 90020 90002 Why VAZ-21124 jerks when accelerating? You began the test, increase the revs and the car starts to shake and twitch. 90003 90002 90059 90003 90002 The course has lost smoothness. What’s the problem? In an unstable supply of auto fuels. In other words, it comes back periodically. Since the fuel in the car delivers a fuel pump, you will most likely need to look in it. 90003 90019 How to cure car? 90020 90002 First we need to conduct a diagnosis of the fuel pump: 90003 90006 90007 Remove the cover and inspect visually, focusing on the place near the valve; 90008 90007 In the absence of o-rings, take steps to address deficiencies.90008 90013 90002 In this case, the depressurization of the fuel pump, and began to be shortages of fuel. This is exactly the fault of the car. After restoring the tightness of the car VAZ-21124 (16 valves) start again to move smoothly on the road. Replacement o-rings can hold their own, the main thing is to find the right ring and tools. 90003 90002 90076 The duration of this work takes about 5 minutes. So to find the problem why VAZ-21124 jerks during acceleration, not so hard. 90003 90019 Problems at low speeds 90020 90002 Consider the jerking at low speeds.In the case of the VAZ-21124 jerks when accelerating at low revs, necessary diagnostics of injectors and harness. If it is located on the fuel tube, there is a possibility that he could peretiraetsya that may cause a short circuit of the wiring and disconnection of injection nozzles. Solution — a complete replacement of wiring. Do not ignore this problem as it can lead to big trouble. 90003 90019 Twitch auto — check the spark 90020 90002 Often the fault of the vehicle associated with the formation of sparks and therefore starts to behave oddly.90003 90002 90087 90003 90002 It is easiest to determine the problem when walking down hills or on a fairly flat plot. To prevent reason you need to check the plugs (VAZ-21124). In the event of their failure, overheating or an unstable — to replace. The price of candles (VAZ-21124) is about 700 rubles per set. 90003 90002 So, what are your actions if the car starts to jerk when pressing on gas. In order to fix the problem, you will have to find her first. For example, if a car goes on gas, the problem may lie in the vacuum regulator.90003 90019 Where is this item? 90020 90002 It is located on the distributor. Upon detection of a broken regulator will not help and replacement carburetor. Most likely to fix the problem will help replace the controller. 90003 90002 The Next culprit periodic twitching of a car can be a spray accelerator pump. To prevent breakage should be removing the diffuser and the pressing of a lever to evaluate the performance of the pump in each chamber. If at least one of them there is an unstable work — it isthe reason for the fact that VAZ-21124 jerks while driving.Complete removal of spray for the cleaning and blowing will help to solve this problem. After the procedure, the cleaned item must be set back. If this was the main reason for the jerking of the car, then the problem is solved. 90003 90019 VAZ-21124 jerks during acceleration. Perhaps it is the fault of the diaphragm 90020 90002 To such shocks could trigger insufficient amount of fuel, which are the most basic blockages of fuel filters. 90003 90002 To determine the technical condition of the filters have to disconnect the rubber hose and make the blowing of the grid.90003 90002 90106 90003 90002 If the specified action is not necessary to forget, that the fuel cap needs to be removed. 90003 90002 After some time the procedure must be repeated, and the cleaning filter you want to add washing the fuel tank. These actions will help to avoid the following clogging and extend filter life. If the cause is not eliminated, and the car still twitches — pay attention to the fine filter. You may even have to replace it with a new one. For the unhindered access of the fuel and the tank must be filled with their specified item and start the power unit.This requires the hose to the fuel to change to a translucent tube and start the injection of fluid into the filter. In conclusion, install all the parts back and make few taps on a hand pump. Only after the plant engine can check his work. The specified action contributes to the rapid filling of the filter with fuel. 90003 90019 Actions of the driver in case of jerking the car with the carburettor engine 90020 90002 Causes of twitching the car is a legacy filter. If this issue happened to you in the way, then the best solution would be contacting the shop.The best way out of this situation will be their replacement. 90003 90019 The cause of the twitching — control unit 90020 90002 The Alleged cause of the tremors lies in shifting. To understand the essence of twitching hard enough. 90003 90002 90121 90003 90002 So if you noticed that VAZ-21124 jerks when accelerating or driving — better to go to the shop for diagnosis. The autofocus easily help to determine why, because the lift is much easier to see the problem. The movement of the machine is idle, allows you to understand not only why the car is constantly pushing, but also to monitor the smoothness of the revs.Sometimes this problem is much harder than it looks, and its detection will need to create special conditions of use, which is quite impossible to carry while riding. 90003 90019 The Twitching of the car when a normally operating engine 90020 90002 This indicates that the engine is OK, and the problem lies elsewhere. In this case, test the following points: 90003 90006 90007 Reliability of fastening of the power unit; 90008 90007 The test stands for integrity; 90008 90007 The strength of fastening of wheels.90008 90013 90002 If the problem is not found — will have to look for specialists for the diagnosis and for some time to stop riding in cars. 90003 90019 Insights 90020 90002 As you can see from the above, causes twitching of the machine during its operation quite a lot. 90003 90002 90144 90003 90002 And do not necessarily need to be expert on automotive Affairs. Minor damage in your car have to fix any. If you notice strange behavior of the car, including shocks, with twitchings, be sure to consult the service centre or ask the professionals automotive business, which have behind shoulders not one year of practice.90003.90000 Generator VAZ 2112: characteristics, repair and replacement 90001 90002 The device of any car providesthe presence of a generator — it is necessary for the generation of electrical energy by converting the mechanical operation of the engine into electricity. Thanks to this device, all appliances that need electricity are functioning in the machine. How is the VAZ-2112 generator arranged? Today we learn its technical characteristics, as well as how to maintain it and repair it with our own hands.90003 90004 Generator set device 90005 90002 Generator VAZ-2112 consists of covers — front and rearback. They are made of aluminum alloy and have special seats where bearings are installed. On the case of the back cover there is a terminal that serves for connecting the battery. Also, it has a connector. Through it, the voltage is applied to the excitation winding. On the back cover there is a capacitor — it serves to suppress electromagnetic interference. There are places on the device for installing and securing the brushes.90003 90002 The cylinder of the core in this generator is madefrom transformer iron. Inside it there are special grooves, into which the winding is neatly packed. Also on the cylinder are conclusions for connection to the rectifier block. The covers are screwed to the stator with bolts. On the shaft, which performs the functions of the rotor, there is an excitation winding. It is connected to copper rings. At the forward end of the shaft is a special groove, which serves to install the drive pulley.Brushes are made by a single knot that is combined with a generator relay. It is housed in a sturdy metal casing and securely attached to the brush holder. The back cover inside holds the diode block — it contains 6 basic elements and three additional ones. They are fixed on aluminum semicircular plates, due to which the diodes are more efficiently cooled. In the manual for the car there is a diagram, with which you can understand how the VAZ-2112 generator works. 90003 90002 It is also used in repair work.90003 90004 Principle of operation 90005 90002 The rotor, whose main task is to createa magnetic field, is the shaft on which the excitation winding is located. Each half of it is placed in special pole pieces. The contact rings supply current to the winding. Rotor rotates due to belt drive from the drive. The stator is a core and a winding. Here, an alternating current is produced, which is sent through the rings further through the electrical network. However, in the beginning it must be removed from the frame.In order to apply current to the rings, a brush assembly is used. Then comes the rectifier block, which converts the alternating sinusoidal voltage generated by the generator. In different cases, different schemes for connecting the field windings are used. For example, another single pair is used. Current simply can not flow through the battery in the event that the engine is not wound up. When winding is connected according to the «star» scheme, it is possible to increase the generator power by 15%.The generator relay is engaged in maintaining the device voltage within the limits specified by the characteristics. It changes the frequency and duration of pulses of electric current. The relay is a set of several sensors and actuators. Their task is to determine how long the excitation winding should be in the network. If the relay is faulty, then the battery will be supplied with a non-stabilized voltage. 90003 90004 Specifications 90005 90002 The VAZ-2112 generator is characterized by the following technical parameters.90003 So, the voltage that is formed on the windingexcitation, can differ in the range of 13.2 V to 14.7 V. The generator itself is capable of producing a current whose strength is up to 80 A. The tension of the drive belt is such that at a pressure of 10 kg the deflection will be equal to not less than 8 mm. 90004 Service of the generator on the car VAZ-2112 90005 90002 It is important to maintain this element in time — it hasa large margin of reliability, but sometimes with an untimely service, you need to repair the car’s generator.First, it is important to clean the outside of the device. 90003 In addition, when service activities are checked, whether the generator is fixed securely. The voltage regulator also needs to be checked. Experts recommend performing a drive belt check. If it is loose, the system will not be able to function correctly. Check the generator belt VAZ-2112 is recommended every 10 thousand km of the car’s run — on the surface of it there should be no defects. Next, check the condition of the bearings.During this operation, it is necessary to remove the belt and rotate the rotor of the device by hand. If during the rotation feels loose or jammed while driving, extraneous noise or any other sounds — the bearings are out of order and need to be replaced. On the VAZ-2112 generator, whose price is about 4 thousand rubles, such details can be found in any store or on the market. 90004 Possible malfunctions 90005 90002 Like all other systems in the car, the generatorcan also fail. Sometimes you can repair and the device will work again.But with some faults only the replacement of the VAZ-2112 generator will help. 90003 Diagnosis of this node is carried out atoccurrence of high noises during operation. Often, noise is caused by heavy wear of the bearings. But often only the bearing that is in the front cover goes out of action. He is exposed to increased radial loads, so he serves relatively short. If the drive belt is too tight, this also affects the wear rate of the bearing. 90004 Electrical faults: diagnostic methods 90005 90002 Identify electrical problems inThe work of the generator can be based on several factors.So, among the popular symptoms — lack of charging, low charging voltage, or vice versa — increased. Without a multimeter, these faults are determined by the main characteristics. So, on the instrument panel the battery charge lamp will light up or blink. Also, with the engine running, the lights are very dim, the windshield wipers are operating at a slow speed. An increased voltage will be reported by the boiling electrolyte in the battery pack and a very bright headlight. 90003 Surface diagnostics can be done withoutdismantling works.For testing, you need a multimeter. It is necessary to measure the voltage at the battery terminals when the engine is running. If the instrument shows 12 V, the generator does not charge the battery. If, with all the electrical equipment turned off, the multimeter gives out below 14 V, then the charge level is insufficient. Experts do not recommend testing the generator with removing the positive battery contact. This can damage the relay. 90004 How to remove the generator on VAZ-2112 90005 90002 For more serious verification, the device needs to beremove.The generator is held on the bracket on the engine block. To dismantle the installation, you need keys 10 and 13, a car key for 17, and a mount and a head for 15. 90003 The first thing to do is remove the terminals from the battery. Then loosen and remove the belt, and then dismantle the belt tensioner mechanism. Next — the wires are disconnected and the connectors are disconnected. The device is he.90000 VAZ 2114, generator: overview, faults, adjustment tips 90001 90002 By car, the VAZ 2114 generator iselectric three-phase machine, producing alternating current. Inside it there is a block with rectifiers, which allows to convert a current (three phases) into a constant one. To make repairs yourself, you need to know the generator’s device and the main breakdowns that can happen. So you should consider everything in order. 90003 90004 General construction of the generating set 90005 90006 90007 Covers made of aluminum alloys.In them are located special nests, in which the bearings are pressed. On the back cover there is a battery connection terminal and a connector ( «dad») for connection to the field winding. Also, a capacitor is attached to the back cover. With its help, radio interference is suppressed. The brush assembly is assembled in the same housing with a voltage regulator VAZ 2114. The generator works by the fact that in the stator winding the EMF induced by the rotating magnetic field of the rotor is induced.90008 90007 The stator is made from plates made ofspecial grades of transformer steel. It has special grooves in which the windings are laid. Each has a pin to connect to the rectifier. The covers are fastened to the stator bolts. The excitation winding is on the rotor. Connect it to the copper rings. They are on the shaft. The pulley of the drive is mounted on the front, there is a keyway on the rotor under it. 90008 90007 The diode block is attached to the rearcover from the inside. It consists of nine semiconductors — six basic and three additional.To ensure high-quality cooling of semiconductors, aluminum alloy plates are used. And on the front part next to the drive pulley is the impeller. 90008 90013 90004 Specifications 90005 90002 Brief description of the technical characteristics of the generator: 90003 90006 90007 The supply of the winding of the rotor (excitation) is produced by a voltage whose value is in the range 13.2 — 14.7 Volts. 90008 90007 Under a load of 10 kg, the sagging of the belt (on a long section) does not exceed 0.8 cm. 90008 90007 The generator at VAZ 2114 (its price in stores is about 4 000 — 4 500 rubles) is capable of delivering a current of up to 80 A. 90008 90013 90002 The unit is located on the left side, the drive is carried out by means of a poly-V belt from the pulley on the crankshaft of the car engine. 90003 90004 Breakdowns in mechanics and electricians 90005 90002 There is such a malfunction in the increasenoise level produced by the generating set. The reason is the destruction of one of the bearings.Typically, the one that is in the front cover — it is affected by very large loads, especially when the belt of the VAZ 2114 generator is pulled too much. For this reason, always check the tension of the alternator drive belt. 90003 90002 As for breakdowns in the electrical part, they can manifest as a lack of battery charging voltage or its low (sometimes too high) value. To check serviceability, it is not necessary to remove the generator from the car. To do this, use a multimeter. Carry out voltage measurements on the terminals of the battery VAZ 2114.The generator should produce about 14 volts. If it is 12 Volts and below, the generator does not produce the required voltage and needs repair. In some cases, the fault lies on the voltage regulator or worn brushes. 90003 90004 Tools for removing the generator 90005 90002 The bracket is attached to the engine block (approx.in the middle). The generator housing is fixed to the bracket on the block using a special strip. Thanks to it, it is possible to adjust the belt tension. To remove the generator, you will need this tool: 90003 90006 90007 Spanners (preferably ring and carob keys) with dimensions «10», «13», «17», «19».90008 90007 On some vehicles, you may need to use a 15 «socket head. 90008 90007 Small mounting or short length of pipe. 90008 90013 90004 Dismantling the generator from the car 90005 90002 If it is necessary to replace the bearing of the VAZ generator2114 , you need to completely remove the unit. First, you must disconnect the battery. Without this, it is impossible to start repairs — a short circuit can lead to ignition of the wiring. Then, using the key to «17», loosen the tension of the drive belt.To do this, unscrew the nut in the upper part and move the case to the engine assembly. A little work with electricity — unscrew the nut from the bolt (pin «31») and disconnect the wire going to the excitation winding. 90003 90002 Below the generator mounting is made with the help ofa long bolt and a nut. The latter has a plastic thread lock. At the top the bar is screwed to the stator with one nut, and to the engine block with two bolts. All the screw connections are twisted to remove the generator.If the thread is attached, use a penetrating grease — it will remove dirt and rust. The generator is lifted up — so it is easier. But you can remove the engine protection and pull it down: on the car VAZ 2114 generator can be removed in two ways. 90003 90004 Dismantling the generator 90005 90002 Tool: 90003 90006 90007 The keys to «10» and «19». 90008 90007 Crosshead screwdriver. 90008 90013 90002 Before starting, make sure that all the spare parts for the generators are purchased. The procedure for dismantling the generator: 90003 90006 90007 Press the latches and remove the plastic cover from the housing.90008 90007 Mark the position of the covers and stator relative to each other — this will facilitate later assembly. 90008 90007 Using a Phillips screwdriver, unscrew the two bolts that secure the voltage regulator to the brush assembly. 90008 90007 Turn off the regulator. 90008 90007 Remove the screws for the rectifier unitdiodes. Disconnect the stator windings from it and remove the assembly. Note that a capacitor is also dismounted with it. With its help, the voltage of the VAZ 2114 generator is «cleared» of the variable component.90008 90007 Unscrew the four bolts, then remove the back cover. 90008 90007 Clamp the rotor in a vice and unscrew the nut from the pulley side. 90008 90007 Remove the front cover. 90008 90007 Visually assess the condition of the units. If there is heavy wear and tear everywhere, it will be necessary to carry out major repairs. 90008 90013 90004 How to identify a malfunction? 90005 90002 Signs of the presence of breakdowns in the generator: 90003 90006 90007 The lamp on the instrument panel (briefly or permanently) lights, indicating that there is no charge — a red battery.90008 90007 There is insufficient or excessive charge of the battery. 90008 90007 The headlights glow dim or noticeably their blinking, the wipers are unstable, constantly changing speed. 90008 90007 The electrolyte boils in the battery, the lights shine brightly, sometimes the lamps burn. 90008 90007 Noises from the generator are observed. 90008 90013 90002 This is a brief description of the problems, but you need to consider them in more detail in order to repair the generator at VAZ 2114.The price of a complete repair will not exceed 1,200 rubles. 90003 90004 Breakage of brush mechanism 90005 90002 You can divide the faults into two types: breakage of brushes or voltage regulator. Replacement of brushes and the relay-regulator is made without dismantle of the generator. Diagnosis can be done too by improvised means — a pair of finger batteries, battery, bulb or tester. The cost of the brush node is quite low, so you can not check it, but immediately put a new one and forget about the problems.But if you get stung by an idea, then the diagnosis is done as follows: 90003 90006 90007 Connect power to the voltage regulator. 90008 90007 Incandescent bulb connect with brushes. 90008 90007 At a voltage of 12-14 volts, the lamp glows. 90008 90007 When increasing to 15-16 volts it goes out. 90008 90013 90002 This is the normal operation of the regulator. If the lamp behaves differently during diagnostics, we can talk about the failure of the relay-regulator. Also worth mentioning are the signs of worn out brushes: 90003 90006 90007 In the on-board network, there is a decrease in voltage.90008 90007 The battery is not charged. 90008 90007 Voltage jumps are observed. 90008 90013 90002 After removing the brushes visually evaluate their condition- If the length is less than half a centimeter, you can safely throw them away. Also pay attention to how the brushes of the VAZ 2114 generator move in grooves — if there is a jam, it is better to install new ones or to drop a little clean oil. Be sure to evaluate the condition of the contact rings on the rotor, sometimes they need to be ground.After installing new brushes it takes a few minutes for them to start working normally. 90003 90004 Diode rectifier 90005 90002 Two signs of failure of the diode bridge: 90003 90006 90007 No charge on the battery. 90008 90007 Charging is much higher than expected. 90008 90013 90002 This failure can lead to consequencesrather negative. If you doubt your abilities, it is better to entrust the repair of the generator to a person who specializes in this. Most often, two diode failures, but replace them is problematic, since these spare parts for generators are not sold separately.It is much easier to buy a new one and install it. The replacement is done in the following order: 90003 90006 90007 In the unit, the contact bolt is mounted with bushings and nuts, and a clamp is made. 90008 90007 Correct and install all the terminals of the stator windings into place, tighten the nuts of their connec 90008 90013.90000 VAZ 21124, engine: features and characteristics 90001 90002 Engine VAZ-21124 — 16-valve representativeline of power units produced by JSC AvtoVAZ since 2004. In fact, this model was the result of another improvement in the VAZ-2112 engine and was installed on production cars: VAZ-21104, 21114, 21123 «Coupe», 21124, 211440-24. Later it was used to create more powerful plants: VAZ-21126 and VAZ-21128 engines of the production enterprise Super-auto. 90003 90004 Engine Specifications 21124 90005 90002 In general, the power unit remained quite traditional, i.e. four-stroke, with one row of cylinders, an upper camshaft arrangement and a distributed fuel injection (injector). 90003 90008 90009 Cooling — forced, air-liquid. 90010 90009 The volume of the cylinders is 1599 cm 90012 3 90013. 90010 90009 The work of the cylinders is standard — 1-3-4-2. 90010 90009 Power at 3800 rpm. — 98 l / sec. 90010 90009 The number of valves is 16 (four for each cylinder). 90010 90009 The diameter of the bottom of the cylinder is 82 mm. 90010 90009 The length of the piston stroke is 75.6 mm. 90010 90009 The compression ratio of the mixture is 10.3. 90010 90009 The minimum speed of rotation of the crankshaft is 800-850 rpm. 90010 90009 The recommended grade of gasoline is AI-95. 90010 90009 Fuel consumption: in the city — 8.9 liters, on the highway — 6.4 liters, in a mixed mode — 7.5 liters (distance 100 km). 90010 90009 The working volume of the oil sump is 3.5 liters. 90010 90009 Weight — 121 kg. 90010 90009 The technical resource of the engine 21124 before the first overhaul, claimed by the car factory — 150 thousand km (almost a car can pass 100 thousand km more).90010 90039 90004 The cylinder block of the power unit 21124 and its features 90005 90002 First of all, the updated cylinder blockdiffers from its predecessor by its height (the distance between the axis of rotation of the crankshaft and the highest point of the block): in the VAZ-2112 it was 194.8 mm, in 21124 it was 197.1 mm. Due to this, the volume of cylinders (up to 1.6 cm 90012 3 90013). 90003 90002 For fixing the head, the diameters of the bolt holes have been changed, now their thread must correspond to the dimensions M10 x 1.25. 90003 90002 Another feature of the improved blockconsists of special nozzles built into the bearings of the main bearings (2, 3, 4 and 5). During the operation of the engine, oil is supplied through them, which cool the piston head. 90003 90002 The engine 21124 has crankshaft, crankwhich (R = 37.8 mm) provides an increased stroke of the piston. The same crankshaft with the marking «11183», cast on its sixth counterweight, is installed on the power units 21126 and 11194. 90003 90002 The pulley for the operation of the gas-distributing mechanism is marked «2110-1005030».And the transverse profile of its teeth is a parabolic shape. 90003 90002 A damper through which, through a poly-belt drive generator, as well as additional units not provided for in the basic configuration, thanks to the special arrangement of its pulley, the torsional vibrations arising on the shaft are significantly suppressed. And the master disk entering the damper construction allows the special sensor to read the crank angle. 90003 90004 Belts of drives used in the engine and their marking 90005 90002 For the functioning of the timing mechanism in the constructionThe 16-valve engine 21124 uses a 25.4 mm wide belt that has 136 parabolic teeth and is marked as «2112-1006040». The resource before a possible replacement is 45 thousand km. 90003 90002 If no additionalhinged aggregates, namely the SUR pump and the air conditioning compressor, then the belt with the marking «2110-3701720 6 PK 742» (working length — 742 mm) is used in the generator drive. 90003 90002 If the GUR pump is installed, a belt of a different size — 1115 mm — is installed to drive the generator. Its marking is «2110-1041020 6 PK 1115».90003 90002 The model with the compressor for the air conditioner has an even longer generator belt — 1125 mm, with the marking — «2110-8114096 6 PK 1125». 90003 90004 Piston group features 90005 90002 The renewed engine also received new pistons inthe bottom of which are provided with valve holes: each piston is made with four grooves 5.53 mm deep, which are designed to prevent bends (breakage) of the valves in the event of a break in the timing belt. 90003 90002 Earlier, if this happened, the connection was lostvalves with a cranked shaft, their movement ceased, but the shaft, carried by the flywheel, continued to rotate by inertia, and accordingly, the pistons also moved.As a result, they collided with the valves. The result is that they bent, broke or even pierced the bottom of the piston. 90003 90002 The dimensions of the piston rings, which can be both cast iron and steel, remained the same: 82 mm. 90003 90002 The piston pin has a floating fit, and its axial fixation is provided by the locking rings. The length of the finger is 60.5 mm, and its diameter is 22 mm. 90003 90002 The connecting rods of the engine 21124 are interchangeable with the connecting rods of model 2112.90003 90004 Cylinder Head 90005 90002 The six-valve cylinder head differs from that installed on 2112, only the increased surface area allocated for the installation of the intake manifold flanges. 90003 90002 To control the valves in the upper part of the cylinder headtwo camshafts are installed: one for the intake group, one for the exhaust manifold. To distinguish them, the manufacturer puts stamps that are on the neck of the shafts behind the second cam. If the last digit is 14, then the shaft is exhaust, if 15, then, respectively, the intake.In addition, the inlet camshaft next to the first cam has an untreated metal band. 90003 90002 Since the head is provided with hydropushers, this saves the car owner from adjusting the thermal gaps between the cams and the valves. 90003 90002 However, this convenience forces the drivercarefully monitor the cleanliness and quality of the oil, since the mechanism of the hydro tappet is very sensitive to foreign impurities in the lubricant, the presence of which can lead to its failure, and it is not subject to repair, only a complete replacement.90003 90002 Valves of the valves of the sixteen-valve motor have a diameter of 7 mm, in the eight-valve they are 1 mm larger. 90003 90002 As already mentioned above, the camshafts rotatethanks to the belt drive coming from the crankshaft. The marks for correct setting of the working phases of the motor on pulleys 21124 are offset by two degrees relative to the same marks applied to the pulleys of the power unit 2112. 90003 90002 Toothed pulleys of an inlet and final shaftdiffer from each other and are marked by their marking: intake — «21124-1006019», graduation — «21124-100606020».In addition, the intake pulley has a circle near the hub and a curtain on the inside, at the outlet there is no such curtain. 90003 90004 Inlet-outlet system 90005 90002 In the design of the intake system, a plastic pipeline is used, which simultaneously performs the functions of both the intake manifold and the receiver. 90003 90002 As an output item, the constructorsengine used Katkollektor — a unit that had not previously been used in the VAZ models and is a neutralizer, which makes up one whole with the intake pipe.90003 90004 Features of the fuel system and ignition system 90005 90002 First of all, it should be noted that the VAZ-21124A new type of fuel ramp made of stainless alloy is used and different from the one that stood on the VAZ-2112, primarily because there is no drain line in the fuel system. The required gasoline pressure in the pipeline is maintained by means of a special valve installed in the fuel pump. 90003 90002 As for the ignition system, it is that high-voltage wires were excluded from its design.The fact is that on the engine 21124 each candle received a separate ignition coil. 90003 90002 The coils are fixed directly to the candles and, in addition, have an additional fastening to the cylinder head cover. Thanks to this innovation, the reliability and efficiency of the ignition system has increased at times. 90003 90004 Engine operating temperature 21124 90005 90002 Many car owners of VAZ cars modelsknow that the working temperature of the engine is 90 degrees Celsius. However, with the advent of 16-valve engines of the VAZ-2112 series, this norm has become not so unambiguous.The fact is that with the introduction of environmental requirements, the engines were modernized, and in connection with this the manufacturer changed the temperature range for them. Now the temperature fluctuations of the engine within 87-103 degrees is considered the norm. 90003 90002 In conclusion, it should be mentioned 90003.